What is Grid Trading? How to Set-up Your First Grid Trading Strategy

In the crypto space, volatility is a common market condition. Prices moving sideways and sometimes in massive upward or downward swings offer traders good earning opportunities, depending on their positions. For instance, while a sharp fall in an asset price sounds like a huge loss, short traders profit from predicting that fall.
Similarly, when the market is less volatile and prices are moving sideways slightly, grid traders benefit from those little price differences. Grid traders can also profit from a sharp increase or decrease in asset price; however, the exchange or bot cannot trade above the price limits set by the trader.
While profitable, grid trading can be confusing because it requires you to set several parameters that determine the outcome of each trade. In the following sections, we examine those parameters and show you how grid trading works in real time, so even a beginner can get started immediately.
In short: A grid trading bot profits from market volatility by placing multiple buy and sell orders at predefined price levels, capturing small gains repeatedly as the price fluctuates within a set range.
Important: Grid trading works best in sideways or range-bound markets. In strong uptrends or downtrends, grid bots can underperform or accumulate losing positions if the price moves outside the grid range.
What is grid trading in Crypto?
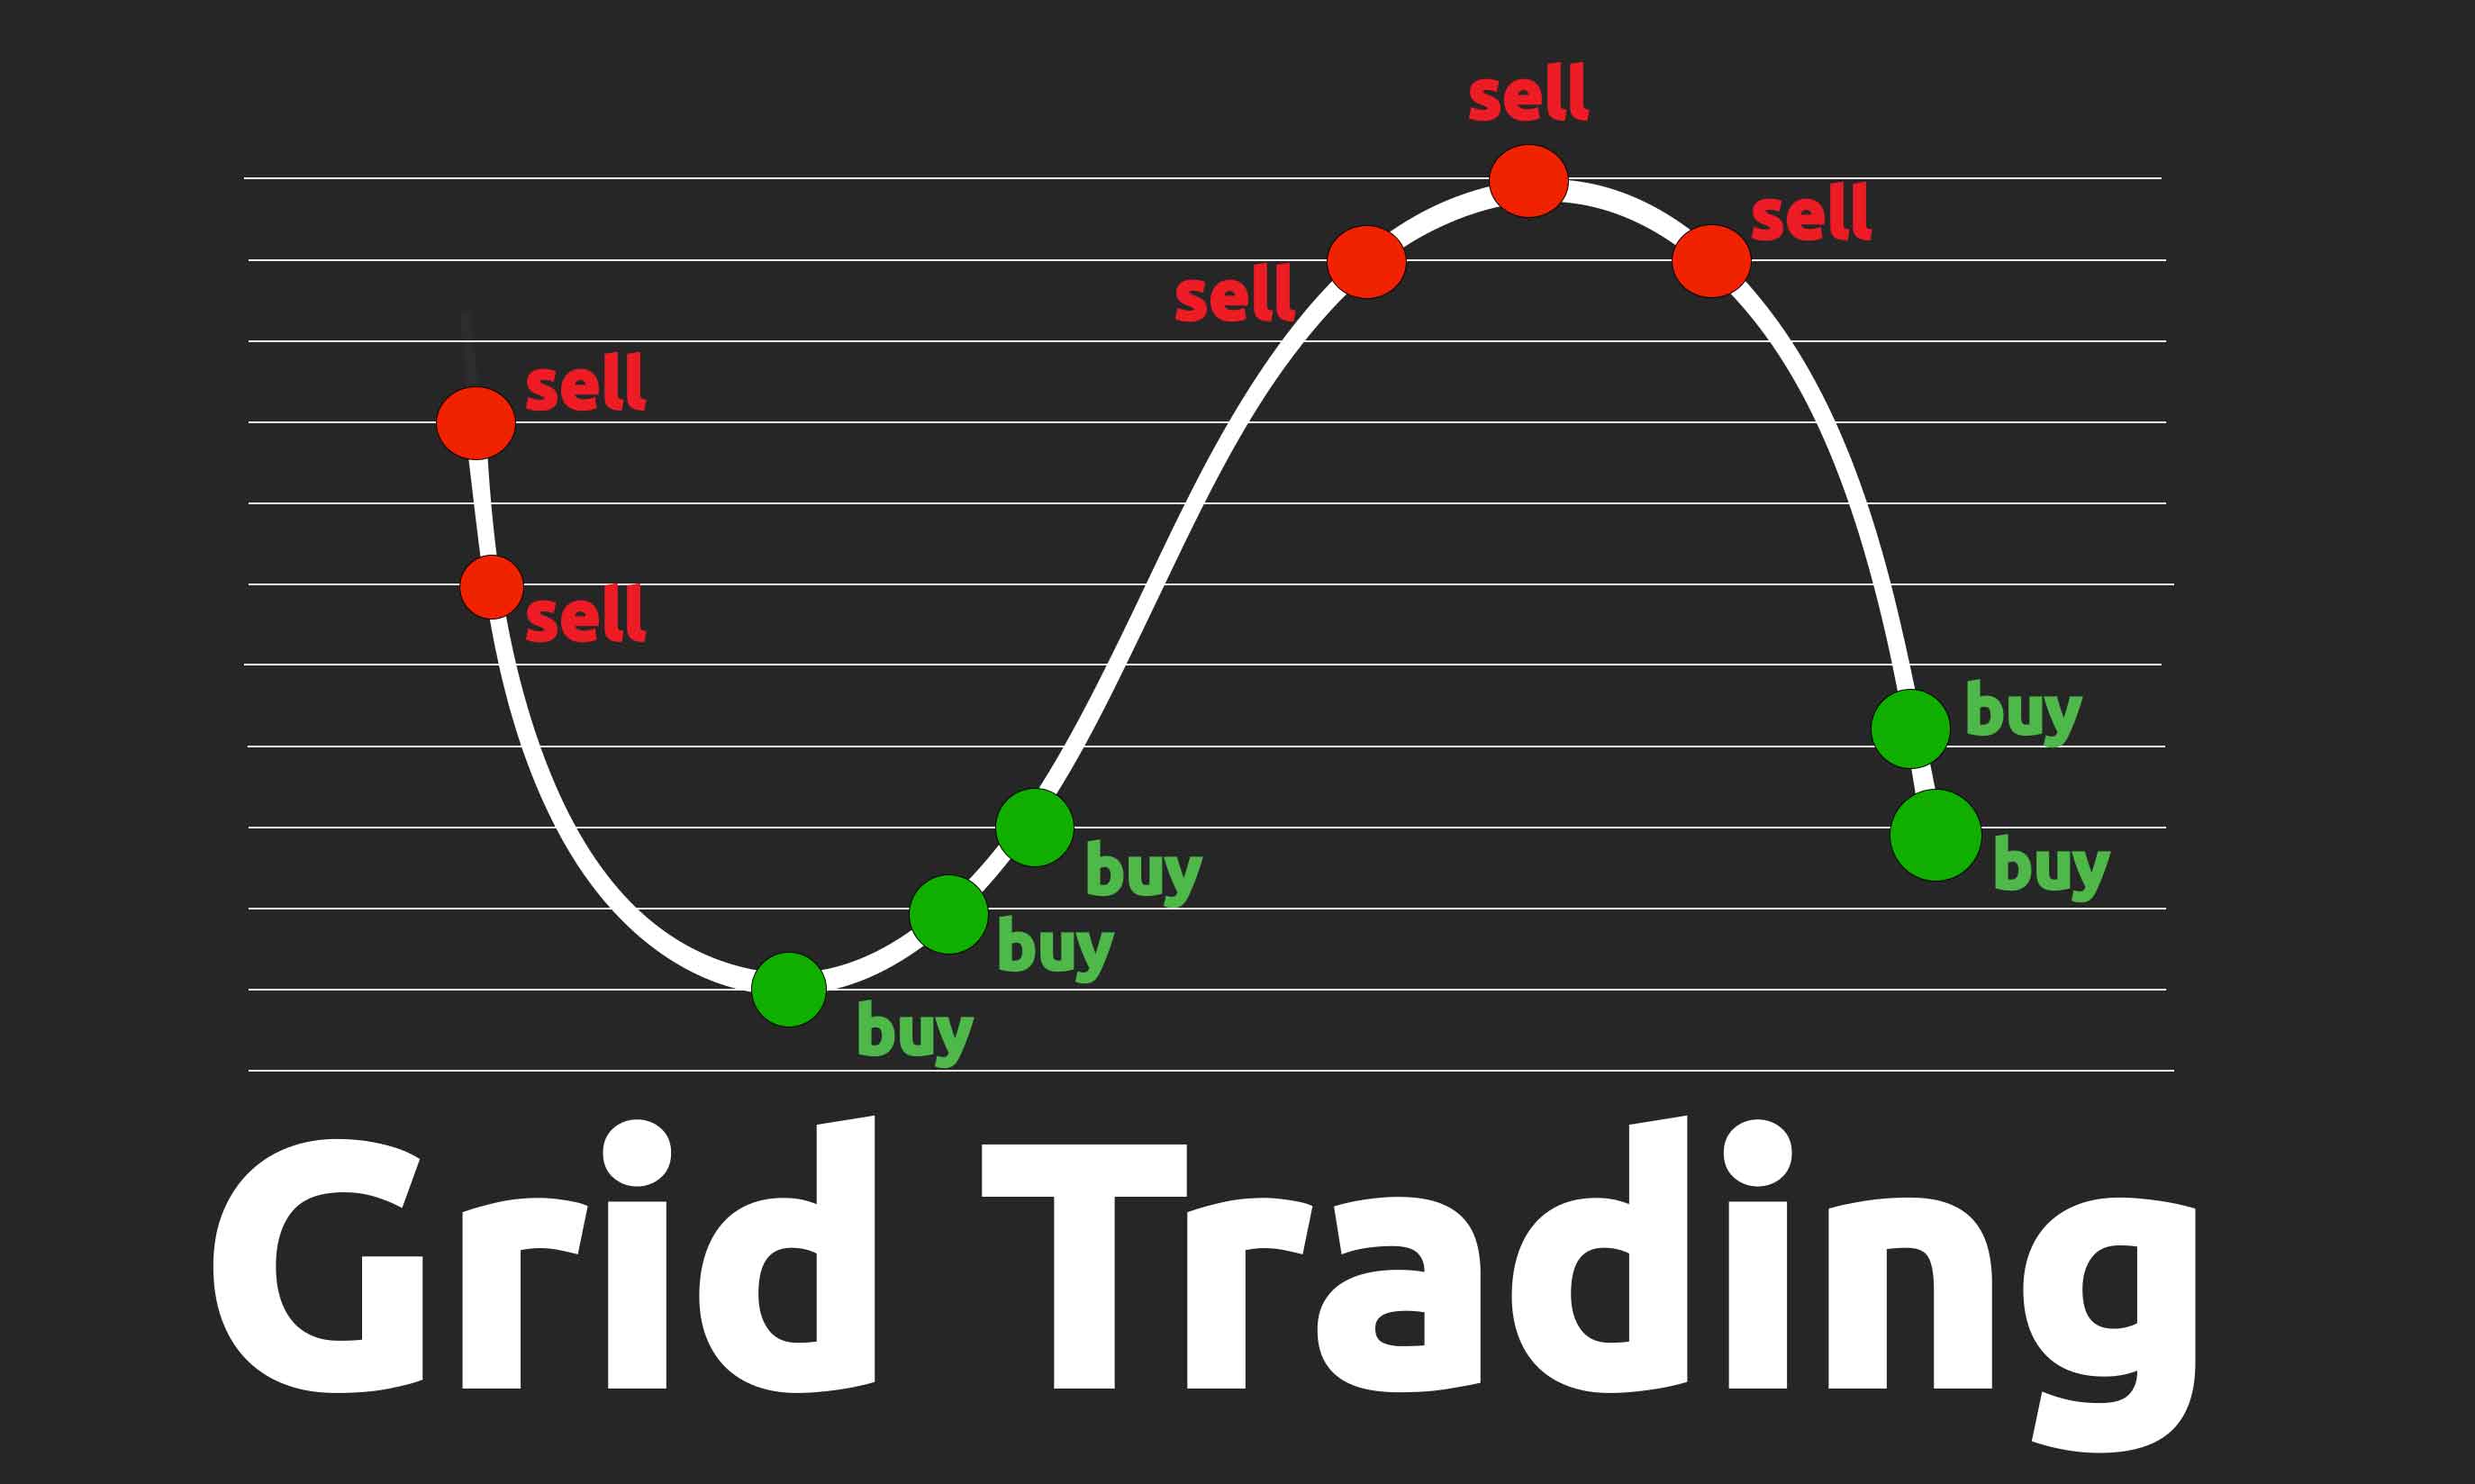
Grid trading is the process of setting multiple buy and sell orders (usually limit orders) within two specific price ranges. For example, the selected price range for $SOL could be between $127 - $155. With this, you can set multiple grids or orders and make significant profits from small price movements, rather than waiting for big price predictions.
The best part is that the strategy adds all the profits you made at each price level to your initial capital. This increases your order value as your trades are filled, thereby increasing the profit size.
For example, I set up a grid trading strategy on Bybit for $SOL between $127 and $155. The bot automatically divided the range into six equal grids. This process creates a series of limit buy and sell orders at clear levels. Below, the bot created one buy order at $127 and five sell orders at $134.66, $138.49, $142.32, $146.15, and $149.98.
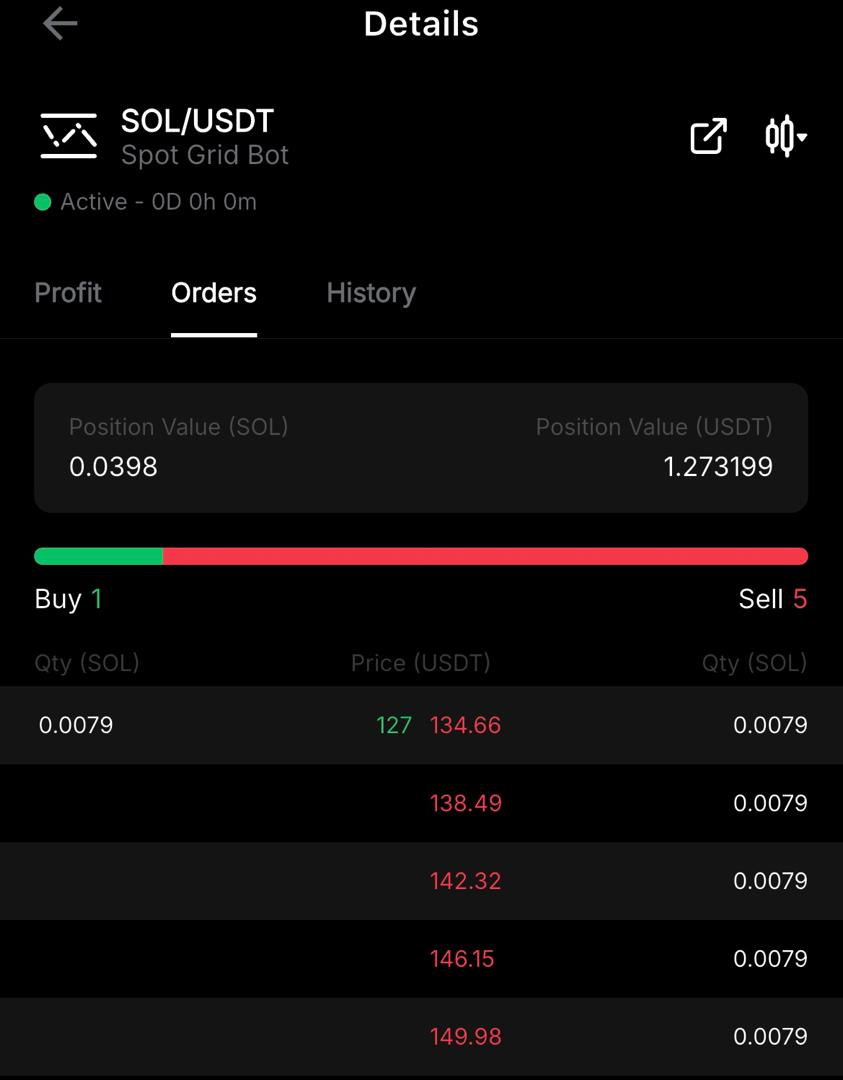
Note: You may set the first buy or sell order at the market price to set your order live immediately or place a limit order.
Two things happen when you set your grid trading range and set it live:
- First, you have set your minimum buy and maximum sell levels; this means the bot will not place new orders outside the defined grid range.
- Secondly, when the asset price reaches a preset level, the bot automatically fills a corresponding order.
Grid Trading Tutorial
In this video tutorial, you’ll see exactly how to set up grid trading bots, with a clear step-by-step visual walkthrough in the video below.
Popular grid trading question: Can you adjust your trade after creating it?
Instead of terminating an active grid trading, you can adjust price levels; however, some exchanges may not offer this, so I recommend checking the parameters before creating a grid. And before joining any exchange, always make sure to do your own due diligence in terms of the safety of the platform. We've created a 5-minute exchange checklist which you can use to check the safety of an exchange.
Using Bybit, I was able to adjust my price levels using the ‘trailing up’ feature. This feature allows you to adjust trading positions as market conditions change.
Types of grid trading
Grid trading can be categorized differently; in this section, we categorized it into three categories based on the options available on the exchange, the process of executing a grid trade, and traders' positions on price performance.
Manual vs automatic grid trading
- Manual grid trading: It gives the trader complete control over their trades. Aside from setting the basic parameters, traders must open each buy order, wait for it to be executed, and then open another sell order. The process is repeated multiple times to make up the number of grids. The strategy relies entirely on the trader's market knowledge, analysis, and emotions.
- Automatic grid trading: This, on the other hand, involves using a trading bot. This bot provides insight into previous price performance while allowing traders to set the necessary parameters. It also means that orders are automatically placed and executed, without the trader constantly watching over the chart.
Comparing manual and automatic grid trading
|
Manual Grid Trading |
Automatic Grid Trading |
|
|
1 |
Full control |
Trading is automated |
|
2 |
Captures every price movement |
Trigger order execution only when the price level is reached |
|
3 |
Relies on the trader's knowledge and emotion |
Uses insight from other traders |
|
4 |
Easy to adjust price target as market condition changes |
Works with predetermined boundaries; however, some CEXs like Bybit offer order trailing that allows traders to adjust grid targets |
|
5 |
Trade execution speed is lower. |
Trade execution speed is faster, and tasks are completed at hyperkinetic speeds |
Spot Grid Trading vs Future Grid Trading
- Spot grid trading: Spot grid trading uses your actual capital to create multiple limit orders and automatically fills those positions as the price of the asset increases or decreases.
- Future grid trading: This is similar to future trading because it not only allows you to set up multiple grids, but also to use leverage to increase your order size. Future grid trading comes with additional features, such as neutral, long, or short orders.
With neutral, traders profit from slight sideways price movement, while long or short positions mean the trader expects the price to rise or fall sharply.
Comparing spot and future grid trading
|
Spot Grid Trading |
Future Grid Trading |
|
|
1 |
Uses your actual capital for trading |
Most exchange offers up to 10x leverage, which increases your order value |
|
2 |
Low liquidation risk |
High liquidation risk |
|
3 |
Recommended for beginners |
Not recommended for beginners |
Range Grid Trading vs Trend Grid Trading
- Range grid trading: As the name implies, range grid trading is an approach used by traders to profit from a crypto asset when its price repeatedly moves within a range. The grids or orders can capture the slight price differences and execute profitable trades at those points.
- Trend grid trading: This type of grid trading follows a significant price movement. It is used when traders are considerably specific that an asset price will follow an upward or downward trend for some periods.
Beyond opting for trend grid trading, it is recommended that traders consider market conditions and asset health. This is possible using crypto analytical tools, following the asset community for the latest update, and watching the chart closely for a few days.
Let's compare range and trend grid trading.
|
Range Grid Trading |
Trend Grid Trading |
|
|
1 |
Doesn't require price prediction as it only relies on slight volatility |
Features price prediction and market analysis to ascertain direction |
|
2 |
Profit margin is small but compounds over time |
Profit margin is high |
|
3 |
Less risky because it benefits from a slight change in price |
Considerably risky if the price moves in the opposite direction. |
How to set up your first grid trading bot
Step 1: Select the grid trading type. Start grid trading by choosing the most suitable option. This usually includes a combination of all three types of grid trading above.
For instance, if a trader decides to execute Bybit spot grid trading for an asset by setting a price range that captures slight price changes over time using the Bybit trading bot, which combines automatic grid trading, spot grid trading, and range grid trading.
To select the grid trading type on Bybit:
- Open the Bybit exchange app, click on "More"
- Click on "trade" and select "trading bot" from the options.
- Now, click on "spot grid" or "futures grid" to start.

Step 2: Select the crypto for your grid trading: Choose a crypto that aligns with your grid trading type. To work with the illustration above, you want to select a crypto asset that oscillates between two prices instead of a random crypto you encounter on Twitter.
- Click on the trading pair at the top corner of the grid trading interface to select your preferred trading pair.
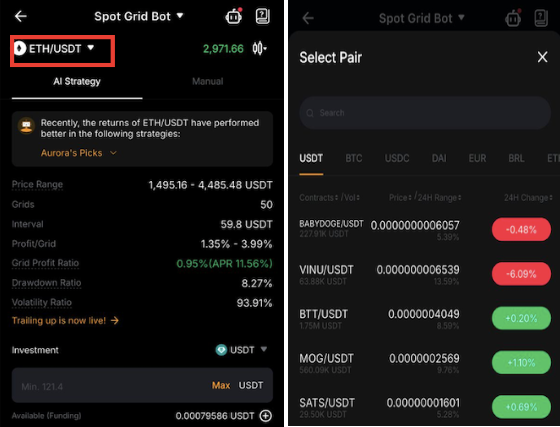
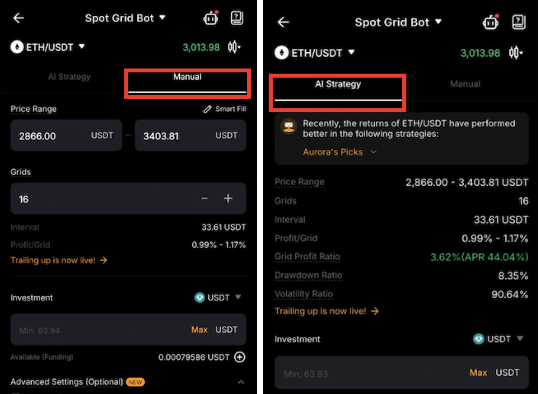
Step3: Set the parameters: While the trading bot handles some of the work, setting others is your responsibility as the trader. From the price range to the number of grids and the profit margin, you can carefully set these parameters using the manual option or simply adopt AI Strategy. You can also copy existing grid trades with preset parameters.
Additional CEXs allow traders to set additional parameters, such as stop-loss and take-profit levels. You can manage risk effectively by using a stop loss when the price falls below the expected range, or a take profit when your trades have recorded some profit.
Step 4: Click 'Create Now': Finally, click on 'Create Now' to set your grid trading live. 
Why setting the right grid parameters matters
Setting the right grid parameters determines the level of profit and losses on your trades. If you are trading with small capital, you should carefully adjust the preferred range and number of grids using the manual option as shown in step 3 above.
With that, you can enter a preferred price range and number of grids, which automatically lowers the minimum trading amount required. You can repeat this process until the minimum trading amount matches your available capital.
On the other hand, traders with high capital can start grid trading with a wider price range and more grids. While this increases the total trading fee, a higher number of grids means the bot executes frequent trades, which can add up and increase total profit over time.
Common mistakes traders make when using a grid trading bot
- Selecting random altcoins: Trading an asset you're unfamiliar with exposes you to a higher risk of losing since the asset price can move in ways you do not expect.
- Using high leverage: Leverage trading exposes users to a high risk of liquidation; hence, it is recommended to use minimal leverage (max 2x for beginners) or no leverage at all.
- Setting too many grids: Too many grids mean the exchange is instructed to complete many orders, which increases the total trading fees.
How to manage risk as a beginner in grid trading
- Identify market direction: One of the most important things to do before you start grid trading is learning how to identify market direction. As noted earlier, grid trading is most profitable when the price of an asset is moving sideways or is in a range-bound. This implies that a sharp change in price could affect your trade and result in losses.
Using trend indicators like Average True Range (ATR), Average Directional Index (ADX), and Bollinger Bands on your trading app or analytical tools like TradingView can help you understand market trends better. For instance, ADX range between 0-20 indicates low volatility and sideways price movement, which is good for grid trading, while ADX above 25 shows that volatility is high and grid trading may not be recommended at a time like that.
Combining ADX with trend direction tools like +DM (Positive Directional Movement) and -DM (Negative Directional Movement) makes it easier to not only expect strong volatility but also to determine upward or downward market direction.
- Try demo trading: Before you start grid trading on decentralized exchanges like Apex Omni or centralized exchanges like Bybit, it is important to try crypto and grid demo trading. This helps you learn more about trading and understand your risk appetite.
- Explore other earning mechanisms: To manage risk properly, it is recommended that you do not put all your capital into grid trading. Instead, you can allocate a part of your total capital to grid trading bot while exploring other earning strategies like staking, DCA, or liquidity provision to earn profits passively.
Grid Bot Trading On Decentralised Exchange
Decentralized exchanges are becoming increasingly popular, and as a result, their features continue to improve. Today, some DEXs even offer advanced tools like grid trading bots. One example is Apex Omni, the decentralized exchange developed by Bybit.
In the video below, you’ll see a step-by-step guide on how to set up grid trading bots on Apex Omni. If you’d like to learn more about the broader shift toward decentralized exchanges, check out our in-depth research on the most popular DEXs in crypto.
Conclusion
While grid trading can offer strong returns when used correctly, beginners with little or no trading experience are advised to start with demo trading. Once you feel comfortable, you can move on to your first grid trading strategy using a small amount of capital. This approach allows you to become familiar with the trading dashboard and experience real-time price movements without taking on significant financial risk. Always make sure that you analyze the market conditions before setting up grid bots; grid bots work best in sideways market conditions.
Frequently Asked Questions
What is a limit order?
A limit order instructs the exchange to buy or sell an asset at a specific price not the current market price.
How does the price interval work in grid trading?
A price interval is automatically set by the bot using the price range, number of grids and trading capital you insert when setting up your trade. It defines the gap between each and sell order, and therefore determines how often the bot executes trades as price changes.
Can I start grid trading with $5?
Yes, you can start grid trading with any amount; however, the bot uses the price range and the number of the grid to set the minimum trading amount. To adjust this, reduce or increase the price range and the number of the grid.
How is profit calculated in grid trading?
Profit is generated each time a buy order is sold at the next higher level. For instance, the $SOL order bought at $127 will be sold at $134.66.
What happens when the price moves outside the grid range?
Orders outside the defined grid range are not executed until the price returns inside the range. However, you can adjust the grids.
Related Articles:
- Decentralized Exchanges Explained: Which DEX Is the Best?
- How to Track Smart Money on Hyperliquid Using Wallet Data (Complete Guide)
- Crypto Sector Indexes Explained